


Het overtollige materiaal moet nog worden weggeslepen en er moeten nog wat gaatjes worden gedicht, maar het ziet er goed uit ... volgende week verder.


 Voor ... (Before ...)
 Na ... (After ...)


 Hier nog wat plaatjes met al het nieuwe staal alvast in positie ...
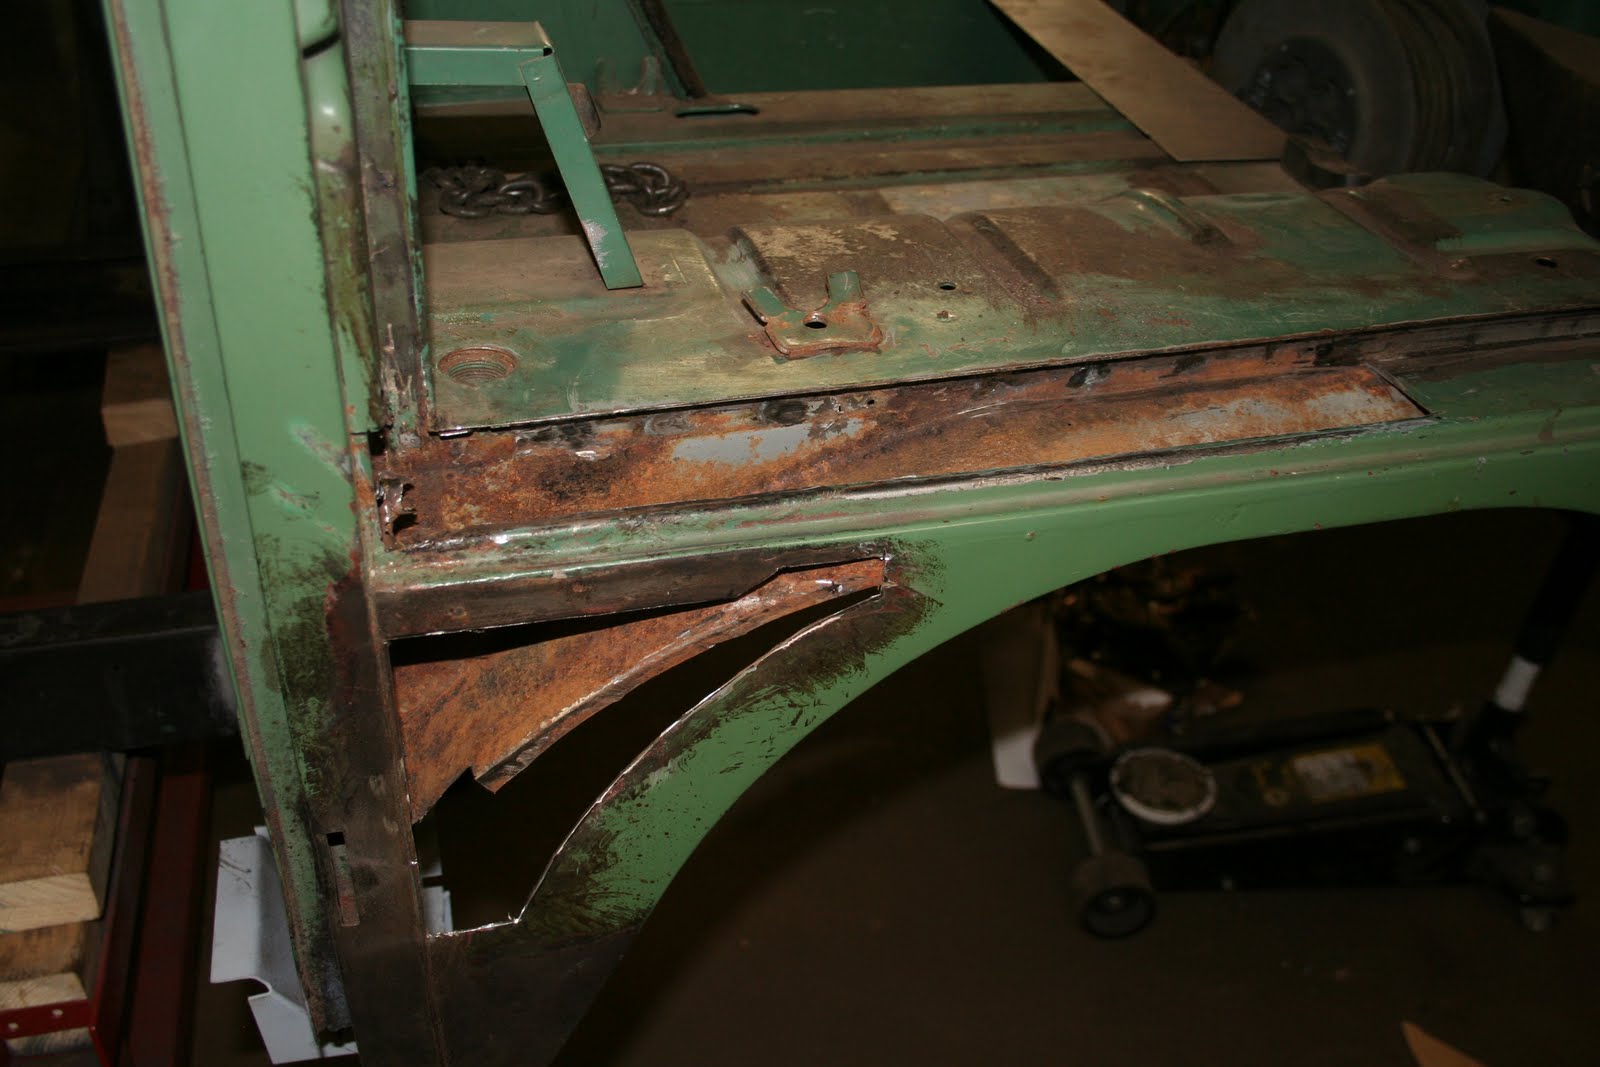
 Ook de linker zijwand wat verder opengemaakt waardoor het allemaal wat beter bereikbaar wordt. Het is de bedoeling om hiervan ook nieuwe panelen te plaatsen, zodat ik nu in ieder geval beter bij de moeilijke plaatsen terecht kan ...

Henk houdt hier de schakeltunnel met nog wat restmateriaal omhoog
Hieronder zie je de vrijgemaakte schakeltunnel uit positie, liggend op de resterende dwarsbalkjes.
Weer wat later zijn ook de resten van de H- en U-balken van de chassisbalken verwijderd, evenals het stelsel aan kabeldoorvoeren. De leegte die nu overblijft is die van een gapend gat. Een ravijn tussen twee magere chassisbalken die de kop en de staart nog bij elkaar houden. De linkerwand en het dak houden het zaakje nog bij elkaar. Maar goed dat het geheel in het hijsraam hangt. Hieronder nog twee foto's in voorwaartse richting vanuit bijna hetzelfde standpunt, met een tijdsinterval van twee weken ... (zoek de tien verschillen)

 Alle leidingen van voor naar achter zijn nu verwijderd; de schakeltunnel wordt zorgvuldig van roest ontdaan en gereed gemaak voor hergebruik. De overige geleidingen worden nieuw aangeschaft.

 Het is maar een van de vele tekeningen ... de schakeltunnel is donkergroen en loopt hier dwars door de achterste U-balk (oranje). Delen van de chassisbalken zijn lichtgroen en de doorvoeren voor de handremkabels zijn in geel. In deze schets gaat het om de lengte van het naar achter uitstekende deel van de tunnel (12 mm). De voorwaartse rijrichting is hier naar rechts. De belangrijkste reden om vandaag niet de gehele tunnel bloot te leggen was ... gevaar voor brand!! Een van de andere huurders in de loods reed vandaag zijn MG naar buiten om een beetje te gaan toeren. Het ding startte niet meteen, maar even later, toen hij 'm lopend had en in z'n achteruit naar buiten draaide rook het verdacht sterk naar benzine. Vanonder zijn bolide liep een meterslang spoor van gelekte benzine achter de auto aan. Een vonkje was vermoedelijk genoeg geweest om de zaak te ontsteken. Wij met z'n drieën de bestuurder meteen gealarmeerd, die daarop het ding afzette en de motorkap opende. Het slangetje tussen de beide carburateurs was gaan lekken en er spoot een aardige straal benzine uit zodra de brandstofpomp werd aangedreven. Henk heeft er even naar gekeken en de eigenaar is vervolgens achter een vervangend onderdeel aangegaan. Het enige wat ik nog heb kunnen doen was het in de primer zetten van de u-balken en het met Fertan bewerken van de binnenkant ervan. Volgende week de rest van de tunnel ... (Camera vergeten, dus helaas geen foto's deze keer ... )
The work on the bottom of the bus isn't anywhere near completion, but we're making (slow) progress. One of the nice things to do is to spray primer on the parts you have just completed. Doing so shows you clearly what the new parts are so that you can concentrate on the jobs yet to do more easily. It gives me a satisfying impression of the work I have done already. Both the cross sections are fitted tight between the chassis beams, the welds have been tinned and the insides have been treated with Fertan so the primer now highlights these new parts clearly. Now that the chassis regained its rigidity I was going to focus on the replacement of the U- and I-beams that support the transporter-floor on top of the two main chassis beams. They are the six top cross beams where both the gear shift tunnel and the two ducts for the handbreak cables to the rear are lead through. For a while I already have the replacement parts in posession, but knowing how delicate the alignment of the gearshift tunnel is I have been somewhat reluctant to begin that part of the repairs. The numerous drawings I made are there mainly to enforce my confidence and to assure an exact fit of the new parts. But I have to go through it once!! The gear shift tunnel has an outside diameter of exactly 30mm and an inside of 28,4mm, I didn't measure its length but it's approximately 1.2 or 1.3 m. Unfortunately this is no standard size available in any shop so I am going to reuse that specific tube, after carefully removing and sandblasting it first. The tunnel runs through six crossfixed U- and I-beams, on top of the two main chassis beams and it is fitted firmly in place with several spotwelds. The two ducts for the handbreak cables are of a more common diameter (12 mm), so I think about replacing them with central heating tubes of equal size. I work back-to-front; the most rear U beam has been cut up until the gear shift tube exposes, the second U beam has been removed completely to make place for the new cross section and the two outriggers and the first I beam has also been cut to reveal the tube. It somehow feels like doing spine-surgical treatment; carefully grinding through vertebra to reveal the central nerve while keeping the patient in a fixed position to prevent dislocations. The drawing is one of many ... the gear shift tunnel is in dark green, the U bar is orange, the two ducts for the handbreak are yellow and the main chassis beams are light green. I made this drawing to remind me of the size of the exposed part of the gear shift tunnel behind the rear U bar, which shows a size of 12 mm. (The front of the bus is at the righthand side of the drawing). I wasn't able to cut through all sections to reveal the tube, because of ... fire alert!! The owner of an MG two-seater, also using the garage, was planning to take a ride on this beautiful Sunday afternoon. While reversing out of the garage he sprayed a long line of gasoline over the floor. All of us smelled the gas instantly and warned the man to stop and turn off immediately. Any spark would have caused mayhem, so I quit grinding at the same time. It appeared that a piece of gasoline hose connecting his two carburettors was leaking and this became stronger with the pressure of the gas-pump. For the rest of the time I did some rust protection of earlier fixed parts. To be continued next week. (I forgot to bring my camera, so no pictures this time ...)


Saw a lot of campers during the holidays; mainly the unmanageble types from over six meters long. How clumsy those things are when manouvering over narrow campingsites and dito alleys in little villages in the south. They arrive on the camping, have to make many moves to take a narrow turn and then they damage their rear lights against a pole, hidden from sight from the drivers' seat, only to squeeze their mobile home in place between two others. After leveling the vehicle on some wedges the first they usually do is to erect their satellite dish and tune in to their home TV-stations. When leaving the campsite for shopping the procedure repeats in reverse order and then they find to their mishap that many little town is too narrow to drive through or even get the thing parked somewhere. Most of the time they find a parking place outside the village and then walk their way to the centre. On many supermarket-parkings they occupy at least two places.
You'd better take a compact-camper. Saw a lot of T3's in Spain and France; on the camping in Creysse there was a rather rare T3 with a folding roof construction. It was a poptop, but without the fabric. The sides were made of solid, foldable stuff, held together with slots. When lowering the roof, the sides fold like paper wraps around a parcel. The British owner was so kind to demonstrate the construction. Unfortunately I didn't make any photo's of it.
Also found a local second hand dealer nearby who had some five T3's on his premise, together with a rare T2b - high roof. Originally it must have been a delivery van which was turned into a camper later. Regarding the straw, dust and chicken feathers hanging around, the thing must have been parked in a shed or haystack. The toothless old man hanging around appeared not to be the owner; he just lived there. The owner wasn't around. (I had no plans though ...)


Had gehoopt daar ter plaatse een paar bekenden te ontmoeten; mensen waarmee ik het afgelopen jaar zo nu en dan contact heb gehad naar aanleiding van o.a. mijn blog, maar die waren niet bij hun voertuig te vinden. Ook veel tijd moeten investeren in voorbereidend werk t.b.v. nieuwe trainingen, dus netto misschien twee dagen in de bus gestoken. Ik was op zoek naar een stuk kachelpijp, je weet wel, het rechte stuk van ongeveer 1,35m dat vanaf het y-stuk, achterin nét onder de laadvloer, door de twee dwarssecties loopt tot voor onder de cabine en daar aansluit op een gebogen stuk naar de ventilatieroosters onder de voorruiten. Maar ik heb het niet gevonden bij de kraampjes in Budel ... een vriend van me laat het nu maken in de werkplaats op zijn werk. Kan ik weer verder. Wel heb ik intussen de achterste dwarssectie er losjes ingelast. Was nog een heel werk om het ding passend te krijgen; er mocht geen spleet overblijven tussen de te lassen delen en het chassis wijkt daar een paar graden uiteen. Helaas was het onderdeel haaks gezet en paste daardoor niet ineens. Heb er nog wat aan geklopt op het aambeeld om het een beetje taps mee te laten lopen met de chassisbalken en het lijkt aardig gelukt. Het zit nu aan één kant vast.
Aanvankelijk meende ik te moeten wachten totdat ik de verwarmingsbuis beschikbaar had, maar na een nauwkeurige inschatting vanaf de voorkant van de bus moest de buis er naderhand ook in te manouvreren zijn. De overige -eerder gelaste en vertinde delen- heb ik alvast in de epoxyprimer gezet; ziet er fraai uit, dat nieuwe spul (zie foto)
Ook leuk: bij het zoeken op Internet kwam ik nog een foto van mijn bus tegen op een site waarop in films gebruikte auto's worden bijgehouden: imcdb.org. Vanmorgen stond er dat het om een 1964 bus ging maar nadat ik er in een commentaar iets meer over had verteld was het spoedig gewijzigd in 1965. Zie http://imcdb.org/vehicle_236353-Volkswagen-Camper-Typ-2-T1-1965.html . Wel weer een mooie foto aan mijn collectie kunnen toevoegen ...
Puntje één heeft alles te maken met mijn gebrekkige laservaring. De moed is er wel, maar de uitvoering kon blijkbaar beter. Na het proplassen van de eerste balkuitloop, waarvan het resultaat er van de buitenkant overigens zeer fraai uitzag, bleek na enige tijd het werkstuk na wat heen-en-weer bewegen gewoon los te komen! De lassen waren eenvoudig niet diep genoeg in het materiaal doorgetrokken. Balen natuurlijk, want dat betekent opnieuw slijpen, ponsen, rechtkloppen en weer positioneren. Allemaal verloren tijd. Na wat geëxperimenteer met instellingen van het lasapparaat op proefstukjes had ik uiteindelijk de slag te pakken en kon dit worden vertaald in betere resultaten. De oplossing: lasapparaat van stand 1 naar stand 2 en de draadtoevoer een stuk hoger. Zo ook de uitloop met kriksteun rechtsachter vastgezet en daarna zaten er twee van die dingen mooi op hun plaats. Deze keer bovendien geen Inox gebruikt (1e keer wel), de restanten daarvan op de nieuw te lassen vlakken verwijderd en gewoon schoon metaal als ondergrond gebruikt. Ik zou de lasnaden naderhand gaan vertinnen en dan moet er ook niets op het metaal zitten.
Puntje twee, het vertinnen, is om de lassen duurzamer te maken. In plaats van carrosseriekit leek het me een stuk fraaier om de spleten tussen de gelaste onderdelen vol te vloeien met tin. Dit is een buitengewoon fraaie manier van afwerken met goede anticorrosieve eigenschappen. Het is nog leuk ook, al moet je er even wat handigheid in krijgen. Hier zie je een vertinde lasnaad:

Het plaatje in de chassisbalk vervangen (punt 3) was nodig om een stevige ondergrond te krijgen voor de later te plaatsen tussenbalk aan de voorkant. Het gaat om de binnenkant van de chassisbalk linksvoor, waar nét het gesloten deel begint. (daar waar het een koker wordt). Het metaal dat er zat was naar binnen gedrukt en bleek toch wat te zwak voor de hechting van het tussenstuk. Dit U-profiel komt er haaks op te staan en dan is een plat lasvlak toch zeer wenselijk. Ik had er al eerder een stukje van 12 x 15 cm uitgeslepen, maar had geen vervangend plaatmateriaal van 1 mm dik voorhanden. Een paar weken geleden heb ik een strook hiervan bij RustBuster in Veenendaal gekocht en daar vandaag een inzetstukje op maat uitgeknipt en geklopt. De maat nemen voor het inzetstukje ging met een stuk papier en een potlood: je legt het velletje papier strak over de uitgeslepen opening, gaat met het potlood voorzichtig over de randen van het gat heen en weer (zoals ik vroeger weleens munten in reliëf op papier liet doorschemeren) en daar verschijnen exact de contouren van het gat. (In mijn geval kon ik in plaats van een potlood gewoon mijn vieze vingers gebruiken; ging wel zo snel). Dit profiel met de kraspen overgenomen op het nieuwe strookje metaal, daarna uitknippen, beetje bijschuren zodat je rondom een spleet van 1/2 mm overhoudt, hoekje zetten, gaatjes ponsen, klemmen en vastlassen. Ik begin er al een beetje routine in te krijgen. Het resultaat mag er zijn.
Na het afslijpen van de lasnaden is het u-vormige tussenbalkje met de rubber hamer op zijn plaats geklopt; het ding paste precies (AutoCraft levert echt goed spul!!). Het positioneren van dit tussenbalkje kostte nog wel even tijd; het is echt millimeterwerk, klopje hier, klopje daar, tikje zus en tikje zo. Eenmaal op zijn plaats de lasklemmen erop en even snel vasthechten. Aan beide kanten heb ik zo twaalf hechtlasjes gemaakt en dat ga ik de volgende keer aflassen en natuurlijk vertinnen. Zie hieronder het resultaat van vandaag.


En dit is het resultaat van vandaag, aan de andere kant:

Hier zie je het verschil tussen de oude en de nieuwe uitloop (achter):

Het verschil in materiaalkwaliteit is aanzienlijk. Wat er op zat is 0,9 millimeter dik en wat ik er nu nieuw heb opgezet is deels 1,2 en deels 2,0mm dik. De maatvoering is overigens perfect!! Ik heb geen aanpassingen hoeven doen.
De twee uitlopen aan de achterkant heb ik nog niet gemonteerd; ik wilde eerst de tussensectie aan de voorkant verwijderen en daar ging nogal wat tijd in zitten. Ik kon het ding er niet in een keer uit krijgen maar moest steeds stukje-voor-stukje afslijpen en lostikken. Hij is er nu uit, maar het kostte zoveel tijd dat het er vandaag niet meer in zat om de achterste uitlopen te vervangen. Volgende week meer ...
