maandag 29 december 2008
35. Nieuwe ijzerwaren ... (New sheet metal...)
Het ligt natuulijk allemaal een beetje losjes tegen elkaar, maar het geeft een aardig beeld van hoe het moet worden. Het is stevig materiaal ... de kriksteunen en de I-balken zijn van 2mm dik plaatmateriaal, de rest is 1,2 mm dik. Zondag heb ik stukje bij beetje de achterste dwarsbalk uit het chassis verwijderd; het vervangingsdeel zie je op de foto bovenin het midden van de achterste dwarsbalken (het deel met het grote ronde gat er in). Aan weerskanten voor en achter liggen de kriksteunen. Tot mijn verrassing was de achterste U-balk aan de onderkant dichtgelast, net als bij de originele constructie, terwijl daarover in de catalogus niets was aangegeven. Nu de vloer voor het grootste deel los ligt begin ik te denken aan ondersteuning van het geheel met stempels en houten balken; er lijkt wat beweging te zitten in de carrosserie t.o.v. het chassis.
The metal I ordered on Friday, December 19th had already arrived on Monday, December 22nd!! The package had a weight of 61.6 lbs. Now the real work could start. First eat our way through Xmas and on Sunday, December 28th I unpacked the metal and aligned it on the garage floor to see how things would fit.
It's all placed together loosely, but it gives a good impression of the work that has to be done. It is solid material: the jack supports and the I-bars are made of 2mm thick steel, the rest is of 1,2 mm steel. Last Sunday I removed the old rear cross section bit-by-bit; the replacement part is shown on the photos as the upper part in the centre of the photos; the part with the large hole in its centre). To my surprise, the rear top-hat section was welded closed to form a beam, just like the original part. And it wasn't even mentioned in the catalogue. Now that the floor is disconnected for the most part I plan to support the whole structure with scaffolding and woorden beams. There seems to be a little play between the body and the chassis.
zondag 21 december 2008
34. Een gewone Zondag ... (A regular Sunday ...)
De rechter wielkast is nu bijna schoon, hier en daar is het blote metaal al zichtbaar en verder heb ik ook de voorrand bij de rechter zitplaats, waar de cabinevloer wordt aangehecht, helemaal kaal gemaakt. Er zat nog wat restmateriaal opgelast en met de lamellenschijf krijg je dat weer keurig vlak. Ook nog wat foto's gemaakt en die zie je hier ...
Tenslotte nog een foto van de voorste dwarssectie (rood omkaderd) tussen de chassisbalken. Deze foto is van onder de cabinevloer in achterwaartse richting genomen en hierop is goed te zien waar de schakeltunnel (Gele pijl) en de twee doorvoeren van de handremkabels (groene pijlen) door de voorste U-sectie heen gaan ...
Today, as usual on Sunday, I spent some time doing different jobs on the bus. Started a bit later, 11:00, and stopped a little earlier 02:45 PM. Last Friday I ordered a lot of steel for the repairs on the cargo floor. All together for a couple of hundred Euros, but I have all the parts at once then, except for the actual floor. If all goes right I will have the parts in time before Christmas, so that I can do a lot in the week's vacation following Christmas.
Above are the pictures I took today, just after cleaning the right wheel well and the edge below the right-front passenger-seat, that's where the cabin floor will be attached and there were some remains of the previous floor left. The last picture shows the front of the cross section between the two chassis beams (The red surrounded part) and you have a great view on the central shift rod tunnel entry (yellow arrow). On each side of it there are the two ducts for the cables of the hand break (green arrows).
zaterdag 13 december 2008
33. Hefdakje is klaar ... (Poptop repaired ...)
Het resultaat mag er zijn ... het gat is erg mooi gerepareerd en als het ding straks is bewerkt met primer en spuitlak zie je er dan ook helemaal niets van terug; zelfs geen verdikking of vervorming. Prachtig werk geleverd!!
Klik hier als je wilt weten hoe het er voor de reparatie uitzag:
http://vw65westy.blogspot.com/2008/04/13-diverse-klussen.html
Yesterday, Friday december 12th, Peter Holthausen called me at 3PM to inform me that the poptop repair was ready. Wow, that is quick!! I had only delivered the part two weeks ago. Promised to come and pick it up in half an hour. I was curious to see how it looked.
Well the results are great ... the hole is fixed perfectly and when the poptop is primed and painted later, I guess there's no way you can see the previous damage. The surface is completely smooth, no thickening or distortion visible. Great job!!
Click here if you want to see what the poptop looked like before the repair:
http://vw65westy.blogspot.com/2008/04/13-diverse-klussen.html
dinsdag 9 december 2008
32. Chassis ...
De Schakeltunnel
Op het niveau daarboven, centraal van voor naar achter door de vloerbalkjes loopt het meest kritische onderdeel; de schakeltunnel ... Dit is een 3 cm dikke buis die van voor naar achter loopt en is aangehecht aan de uiteinden. Door deze buis loopt de schakelarm, die de bewegingen van de versnellingspook doorgeeft aan de versnellingsbak. Wil je soepel kunnen schakelen, dan is het van het grootste belang dat deze tunnel exact uitgelijnd ligt, mede omdat de schakelarm zich tegen de binnenkant van deze buis afzet bij het kiezen van een andere versnelling. Het probleem is dat erg lastig is uit te vinden hoe deze buis op een nette manier kan worden verwijderd en ... niet minder belangrijk; hoe deze weer in de oorspronkelijke positie kan worden teruggemonteerd in de nieuwe vloerbalkjes. Als iemand het weet mag ie het zeggen ... Ik wil graag de vloerbalkjes, de dwarssecties en de balkuitlopen (waar de kriksteunen op worden gelast) vervangen. Om het chassis niet als een kaartenhuis in elkaar te laten vallen werk ik onderdeel-voor-onderdeel af zodat de constructie in vorm blijft. Daarom begin ik met de onderste dwarsstukken; eerst achter, waar de kachelpijp doorheen loopt. De chassisbalken worden dan tenminste nog bij elkaar gehouden door de opgelaste vloerbalkjes. Hieronder een ruwe schets van de wirwar aan tunnels en buizen. (Wordt later nog uitgewerkt).
On Sunday December 7th I scratched some more Tectyl from the right-front wheelwell. After that I continued grinding away useless parts of the chassis. It's like a big puzzle; not only did I discover rusty remains of the original cross-sections under the "newly" weld-in parts, (the U-shaped bars, mounted front and rear between the main chassis beams), but there's also a lot of ducts running from front to rear. The lower ones, mounted from below against the six floorbeams, seated in cutaway sections in the cross-members, consist of the hand-brake-cable ducts (2x), the clutch- and throttle-cable ducts and two ducts that control the heater valves in the rear. In total six apparently randomly drawn tubes, running from the cockpit to the engine room.
The Shift rod tunnel
On the level above that, you will find the probably most critical tube; the shift rod tunnel. It is a 3 cm thick tube, running from front to rear through all six floor supporting beams, positioned centrally above the heater duct. Within this tube there's the shift rod, that directs movements of the gear shift lever to the front of the gearbox so that you can change gear. If you want a smooth shifting experience, it's of utmost importance to have this tube aligned correctly, mainly because the shiftrod uses the tube as a pivot lever when changing gear. Trouble is that there's no documentation as far as I found out, that describes how to remove this tube in a proper manner so that you can reinstall it later in exactly the same position. If you have a clue; please be so kind and tell me how to do this job ... I would like to replace both the two cross sections and the six floor beams (3 x I-profiles and 3 x U-profiles), as well as the four outriggers on which the jackpoints are welded. To maintain stability of the chassis I plan to remove only single parts at a time, starting with the rear cross section (that holds the rear part of the heater-duct). In the meantime, the chassis beams are held together with the remaining floorbeams and the rest of the body. (The illustration shows a rough scetch of the tubes and ducts under the cargo floor. The drawing will be refined later ...).
zondag 30 november 2008
31. Krabben ... (Scratching ...)
Deze keer mezelf bezig gehouden met de edele kunst van het Tectyl-krabben. Dankzij de lage temperatuur buiten (en dus ook in de loods) van ongeveer 0° C is Tectyl hard en niet stroperig. Daardoor kun je gemakkelijk met bijna alles wat je tot je beschikking hebt plakjes van dit zwartbruine spul van de onderkant van de auto afkrabben, -slaan, -duwen en -schuiven. Zo kwam er met gebruik van o.a. een schroevendraaier, een staalbeitel en een plamuurmes steeds een fragment ter grootte van een halve postzegel los van bodem en wielkasten. Het ruimt wel mooi op, al zie je er na een uurtje uit alsof je in een kolenmijn werkt. De zwarte troep op de vloer draagt zeker bij aan dit effect. Na drie uur krabben heb ik de wielkast rechtsvoor zo goed als kaal gekregen, op een stuk van nog een paar tiental vierkante centimeters na. Dat deel zat boven mijn hoofd en m'n armen werden na enige tijd loodzwaar. Volgende keer verder. Het staal eronder ziet er over het algemeen goed uit.
Weer wat later kwam Eric even langs, hij was nog niet eerder wezen kijken, maar was wel benieuwd naar de status van het project. Hij had z'n camera meegenomen en heeft een paar erg mooie foto's van de werkplaats gemaakt, die ik hier natuurlijk graag laat zien: (klik op foto voor vergroot exemplaar)
Today I kept myself busy with the noble art of Tectyl-scratching. Because of the low temperatures outside (and inside too) of 0° C, Tectyl happens to become solid instead of viscous. Any tool will easily help scratching, pushing or shifting tiny bits of the brownish-black stuff from the car body: you can use a screwdriver, chisel or putty knife. After no less than three hours I had the front-right wheel-well almost cleaned and I looked like someone working in a coal mine. The floor, covered with black chips added to this illusion. There is part of the job left to do overhead, because working with my arms in the air happens to become a burden after so many minutes. More next time. The steel under the Tectyl appears to be in a great condition.
A while later, Eric visited the shed, he was there for the first time and curious about the project. He brought his camera and made a dozen photos, some of which I have placed here, because they look great. (Click to enlarge...).
zaterdag 29 november 2008
30. Hefdakje uitbesteed ... (Poptop outsourced...)
Last week I took the poptop (... with the ugly square hole in it ...) to Holthausen Composites in Zevenaar. I was there earlier this year, in May, but while they were very busy at that time, they advised me to try again in the fall. No problem ... I wasn't in a hurry anyway and neither was I about to fix it myself. It has to be done correctly and I've seen a lot of clumsy repairs on polyester parts. The poptop is a very visible part of my bus, so I prefer to have it fixed by professionals.
Andere camper(s)
Ondertussen ook nog even wat rondgezocht op het web naar een """tijdelijke""" -klassieke- camper voor het komende jaar. (Let op het aantal aanhalingstekens ...). Tijdens deze zoektochten kwam ik natuurlijk ook op andere merken terecht. Een bus die me erg aansprak was een Mercedes O 319 uit 1959. Blijken erg zeldzaam te zijn, al vallen de prijzen me desondanks mee. Vast moeilijk om aan onderdelen te komen ... (let eens op de fraaie "Samba" raampjes bovenin):
Hier is er nog een ... (verkocht!!!)
Other Camper(s)
Meanwhile I have been searching the web for a ""temporary"" classic camper for next year. (Mind the number of quotes ...). Between these searches I obviously came across other makes than VolksWagen of course. A bus that I liked a lot was this Mercedes O 319 from 1959. They appear to be very rare, although prices arer usually a lot lower than most of the splitties. Probably harder to get spare parts ... The one on the top two photos wasn't for sale, the one on the third photo was sold only recently ...
zondag 23 november 2008
29. Verwijderen van verroeste delen ... (Removing rusty parts)
Op verschillende plaatsen heb ik het slecht gelaste plaatmateriaal eruit geslepen, zodat dat later kan worden vervangen door mooier plaat- en laswerk. Het zit 'm voornamelijk in de wielkasten, de kriksteunen en de draagbalken. Zie hieronder de rechter wielkast na het verwijderen van een plaatje van ca 15 x 10 cm en het restant van een kriksteun. Wat er nu nog zit is hard, behalve de driehoekige balkuitloop. (het roestkleurige deel). Photo below shows the right front wheel well after grinding out a square part of the bulkhead and part of the outrigger with jacksupport.
En hier zie je hoe het eruit zag voor het weghalen van de krokante restanten.
(And this is what it looked like before removing the crunchy parts).
Op onderstaande afbeelding is goed te zien welke chassisdelen goed zijn (groen), welke moeten worden vervangen (bruin) en wat er vandaag is verwijderd (rood). Klik op de afbeelding voor een uitvergroting.
Een speciale uitdaging vormt hierbij de tunnel voor de schakelstang, die van voor naar achter door de gaten in de -bruin weergegeven- balkjes loopt. De truc is om dit straks weer fraai uitgelijnd te krijgen.
Now that both axles and the steering house are removed we can reach almost everything. As long as I haven't got a clue about what to do with the bus front we kept ourselves busy with two other jobs: (1) Removing all the rusty parts from the cargo-floor, bad sheet metal and supporting bars below the floor, and (2), cleaning the front chassis beams and the front wheel wells. Before placing the grinder in any part I thorougly photographed and documented the way the cargo floor was attached to the rest of the body. When the floor is completely removed later, might forget how it fitted in. Later I cut off the jack-supports on the right side, front and rear, and part of the floorbeams and outriggers. (They were once repaired and welded badly ... part of the metal wasn't welded at all; you could move it by hand). Henk removed the brake- and clutchpedals and the brake cylinder. After that he cleaned the front part of the left chassis beam, together with the wheel well. That looks neat now, it just needs some cleaning with thinner and then it can be protected and coated.
On several places I removed more badly welded and rusty sheet metal, so that it can be replaced with new material soon. Click on the wireframe picture (above) to see what parts of the chassis are OK (green), what parts need to be replaced (brown) and what parts were removed today (red). A special challenge here is the replacement of the cross bars, -brown- through which the tunnel is mounted for the gear shift rod. It runs from front to rear and needs to be positioned exactly in line again.
zondag 16 november 2008
28. Vooras en stuurhuis er af ... (Front axle and steering house removed)
Van Gerhard een handige fuseekogel-trekker -of hoe heet zo'n ding- mogen lenen en daarmee kregen we vandaag de stuurstang (E: Draglink) vrij gemakkelijk los van de hefboom op de onderste vooras.
In bovenstaande afbeelding zie je bij "1" de fuseekogel die los moet en bij "2" zie je drie van de acht bouten die de vooras met ankerplaten aan het chassis schroeven. De werking van het geheel is vrij simpel: als je het stuur rechtsom draait, draait de pitman-arm (3) onder aan de stuurkolom naar voren en trekt met de stuurstang aan de hefboom (bij 1). Daardoor beweegt het stangenstelsel aan de achterkant van de vooras naar links (in de afbeelding naar rechts) en scharnieren de voorwielen naar rechts.
Vandaag had ik hulp van Paul; het verwijderen van de vooras kun je moeilijk alleen doen en Paul heeft al vaker meegeholpen. De vooras rustte op de garagekrik, maar na het verwijderen van de acht bouten, waarvan twee met de luchthamer moesten worden losgemaakt, bleef hij klem zitten aan de chassisbalken. Toch maar even wat WD-40 er tussen gespoten, paar minuten wachten en nog eens proberen. Na een paar trappen tegen de trommelremmen begon er beweging in te komen. Nog een paar pogingen later kwam hij los en toen pas ontdekte ik dat de schakelstang (versnelling) nog tussen de twee voorbalken doorliep. Hij was aan beide zijden los; de versnellingspook was al eerder verwijderd, net als de versnellingsbak (zie blog No.27), maar de stang die de bewegingen van de pook moet doorgeven aan de versnellingsbak liep nog van achter naar voor tussen de voorbalken door. Hij raakte verbogen door het gewicht van de vooras en kon pas nadat we de zaak hadden weggereden worden losgetrokken. Tja, er gaat ook wel eens iets mis ...
Er was nog tijd over, dus meteen maar de stuurkolom losgemaakt. Met de trekker ook de fuseekogel aan de voorkant -bij de pitman-arm- (In de afbeelding bij "3") eruit gehaald.
De fusee-kogel-trekker ... of zoiets. Erg handig!!
De vijf bouten waarmee het stuurhuis aan het chassis vastzit konden met de luchthamer makkelijk worden losgemaakt en even later trokken we het hele ding door de vloer naar buiten. Het gaat nu allemaal lekker snel. Nog even wat foto's van vandaag ...
De vooras ... onder de bus hangt nog een stuk van de kachelpijp. (The front axle ... the tube sticking out below the bus is part of the warm air duct)
Nog wat slijpwerk aan de lage carrosseriedelen ... (Some more grinding on lower bodywork)
To remove the front axle you have to disconnect the break lines, remove the draglink from the swing lever and remove eight bolts where both anchor plates connect the fromt beam to the chassis. Don't forget to support the beam with a solid jack! The brake lines were disconnected last week and four of the anchor plate bolts were loosened by Henk the same day. Just because we had no extractor to remove the drag link from the swing lever we had to wait until this week before continuing. I was able to borrow an extractor from Gerhard and we (Paul and I) were going to use it today. Within a few minutes the ball joint popped out and we could focus on removing the eight bolts. After that the beam wasn't coming down with the jack; it was simply stuck to the chassis beams. A few kicks against the drum brakes (and of course some WD-40) did the job.
In the top drawing you can see the ball joint, connecting the drag link with the swing lever designated by "1" and "3" shows three of the eight bolts connecting the anchor plates to the chassis beams. It functions really simple: When turning the steering wheel to the right, the pitman arm "3" rotates forward and pulls the drag link, which in turn rotates the swing lever clockwise. Behind the beams, two tie-rods make the wheels turn to the right.
Today, Paul was my assistant. Removing the front-axle isn't something you can do on your own easily, and Paul has helped me before. After the axle came down with the jack I found the gear shift lever stuck between the two front beams. I had forgotten to remove that before lowering the thing. Sometimes things go wrong ...
There was some time left, so why not remove the steering column right now. The steering wheel was loosened some months earlier, so removing it was done quickly. The steering house is fitted to the left chassis beam with five bolts. The pitman arm is connected to the drag link with, again, a ball joint; we had the tool to remove that part. (It went even easier than the other ball joint). With the use of the air wrench we had the steering column removed within ten mionutes.
zondag 9 november 2008
27. Achteras verwijderd ... (Rear axle removed ...)
Weer getwijfeld over wat ik nou met de voorkant zou gaan doen; vervangen of gewoon plaatdelen repareren ....
Today we planned to remove the front-axle first and after that we'd do the same with the rear-axle and transmission. We did not manage to get the front axle free completely, because we needed a special tool to remove the ball-joit from part of the steering gear, so next weekend we'll be probably more succesful. We continued with the rear axle and transmission. According to the Volkswagen repair manual you can remove the rear undercarriage in a few simple steps. Remove the brake tubing by unscrewing the rubber hoses from the metal tubes. Unfortunately these were too worn out to get a good grip on them so we took the mini grinder instead and simply cut through the metal tubing. (The whole stuff is going to be replaced anyway). After that you had to remove the lower shock absorber bolts, the four bolts connecting the spring-plates to the reduction-gear and brake assembly and the four (2 small, 2 large) bolts connecting the gearbox to the chassis. Disconnect the gear shift lever from the front of the gearbox, disconnect the handbrake cables, the clutch cable and carefully take the rear axle assembly backwards from the bus, supporting it on a solid garage-jack. We managed to get the whole thing out in 20 mins.
Next week we will do the front axle. Meanwhile i'm still having doubts about the bus front ... replace the whole thing or just use repair patchwork ...
zondag 26 oktober 2008
26. Bus op trolley ... (Bus lifted on trolley)
Met de slagsleutel van HotRod was het losslaan van de kroonmoeren van de achteras ook een peuleschil; binnen vijf minuten had ik aan weerskanten de remtrommels er af. Aan de voorkant ligt dat toch wat lastiger: hier zitten twee moeren met een borgplaatje klemvast gedraaid. Dat is leuk voor een volgende keer.
Henk was inmiddels met de Ford aangekomen dus we konden aan de slag met wat laswerk.
Apparaat klaargezet, spatbordranden vastgeklemd; aan de slag. Na een kleine anderhalf uur zaten beide spatbordranden erop. Helaas kwam ik er wat te laat achter dat de knop van het lasapparaat niet op 1, maar op 3 stond. De onderkant van de draaiknop stond op 1 en niet de punt (180 graden gedraaid dus) ... Vandaar dat het hier en daar wat sputterde. En ik maar denken dat ie op de laagste stand stond. Balen. Uiteindelijk is het er toch allemaal goed op gekomen. (Zie foto's)
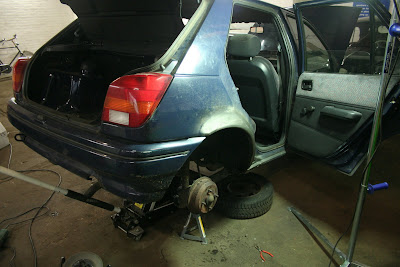
Saturday, Oct 25th, we took our last belongings from the barn, the folding bed (z-bed), wallcloset and garage-jack, and closed the door behind us for the last time. It was the last weekend in October, so many tennants were there at the same time, gathering their last bits.
A little later, Henk arrived in the Fiesta, so we could start welding. He had prepared the sheet-metal for welding; punched holes in them and prepared them with InOx spray. An hour and a half later, both fenders were welded and it was at that time that I found out that the welder was set too high (position 3 instead of 1, which is normal for sheet metal). So that's why the welding spattered!!. I was convinced that the knob was at its lowest position (reading "1"), but it was turned 180 degrees further, giving the wrong impression. I regretted my mistake, but the finishing of the fenders made the whole appearance look well.
maandag 6 oktober 2008
25. Nieuwe plek ... (New Space)
En de aankomst in Arnhem ...
Bij het ophalen van de trailer, in Doesburg, ook nog even een heel mooie Samba gezien van mensen uit Noord-Holland. Is ooit door HotRod gerestaureerd ... plaaaatje!!
vrijdag 5 september 2008
24. Uitbesteden ??? ...
woensdag 13 augustus 2008
23. Tegenslag ... (Setback ...)
Nou, meteen maar advertenties geplaatst op marktplaats (ging de vorige keer ook vrij snel...) en maar hopen dat het allemaal snel geregeld is.
Hoe graag ik ook de restauratie helemaal zelf zou willen doen, er komt een moment dat je andere opties gaat vergelijken. Zo ben ik met Paul vlak voor de vakantie een kijkje wezen nemen bij Hot Rod in Doesburg en daar stond een prachtige rood-witte SO-42, bijna klaar voor aflevering aan de klant. De restauratie van deze bus was door HotRod uitgevoerd en is voor het grootste deel in Tsjechië verricht. Het ding zag er onwaarschijnlijk mooi uit, alles in het nieuw en keiharde lak. Als het erop uit draait dat er op korte termijn geen loods meer beschikbaar komt dan laat ik mijn bus ook door hen restaureren. Inmiddels heb ik het contact daarvoor gelegd en wordt er door hen in september een inschatting gemaakt van de te verwachten kosten.
Ondertussen ga ik aan de slag om desondanks toch weer ruimte te vinden, heb ik een paar advertenties geplaatst en vervolgens wat mensen ingeschakeld om te helpen zoeken ...
Last week I was driving home from holiday in France, eager to start working on the bus again. Then there's this sudden message that the barn we use for restoration is sold and that we have to clear the space before next Oct. 1st!! There's hardly a worse moment to choose because the bus is in parts and I was planning to remove the wheels this week. Luckily I wasn't this far yet, because moving the thing would be difficult, even when it is on the trolley. It started with a voicemail from Donny, half way in the holidays, in which he mentioned bad things to happen.
I placed an ad immediately (it worked OK last time ...) and cross my fingers for a quick response.
No matter how much I'd like to do the restoration myself, sometimes you need to compare other options. Paul and I visited a company called Hot Rod, just before the holidays and during the guided tour we saw a beautiful red-white SO-42, being prepared for delivery to a customer. It had just returned from Czech Republic, where HotRod uses to have a greater part of their restorations done. The bus was in better-than-new condition and it was awesome!! If things turn out so that I cannot find other workspace in the next months I will have my bus restored the same way, by the same people. I made a phonecall and they will come and take a look in the first week of September, just to make an estimate of the cost.
In the meantime I will try to find new space, I placed a couple of ad's and contacted lots of people to help me find something.
dinsdag 22 juli 2008
22. Vastzittende wielbouten ... (Stuck wheelbolts ...)
1. Spuit de wielbouten waar mogelijk overvloedig in met WD-40 en wacht een etmaal
2. Huur een electrische slagsleutel; het apparaat dat ik heb gebruikt had een slagmoment van 260 NM. (Mijn persluchthamer haalt dat niet, maar dat is ook een goedkoop ding)
3. Geef een paar forse klappen met een vuistje op de bout, of liever, op een kruissleutel die je op de bout hebt gezet. (Zo beschadig je de boutkoppen niet...)
4. Zet de electrische slagsleutel er op en beginnen maar ...
Het kan even duren, wees geduldig en geef niet op! De dop op de sleutel kan behoorlijk heet worden. In mijn geval heb ik het ding tussendoor soms wat minuten moeten laten afkoelen.
Na verloop van een paar minuten geeft de bevestiging het op en begint de bout in beweging te komen. Het heeft me bijna twee uur gekost om alle tien de wielbouten van de voorwielen los te krijgen, maar doorzagen zag ik echt niet zitten. Omdat ik de bus niet op de kriksteunen had staan (ik wilde de wrijving tussen band en vloer gebruiken) heb ik steeds één bout tegelijk losgemaakt, deze goed ingevet met kopervet en 'm daarna met de hand -handvast- weer teruggeplaatst. Dit bout-voor-bout. (Allemaal tegelijk is op deze manier natuurlijk vragen om moeilijkheden...) Nu kan de bus tenminste op de trolley, al zal dat wel na de vakantie worden ...
Today it worked!! I told you about stuck wheelbolts before and that it obstructed further progress in removing the axles and frontbeam, (Henk even suggested to cut the bolts off with a grinder or saw ..). Last week Tuesday I managed to loosen the bolts of the rear wheels by means of a 5 ft lever, put over a cross-wrench, bit-by-bit, but the front wheels didn't cooperate. Today I finally got the job done. Here's how:
1. Apply lots of WD-40 to the thread of the bolts -wherever you can- and wait 24 hrs.
2. Rent an electrical hammer-wrench with a torque of at least 260 NM. (I have an air driven one myself, but it was too cheap to gain such force).
3. Hit the bolts with a few firm blows using a heavy hammer, or even better, hit a cross wrench placed on the bolts so that you don't damage the bolts themselves.
4. Put the electrical hammer-wrench on the bolt and GO!!
It might take a while, be patient and don't give up! The socket can get very hot during endless attempts with the tool. In my case I had to let the socket cool down for a while during some attempts. After a few minutes the fastening gives up and the bolt starts to move slightly. It took me almost two hours to loosen all ten bolts of the front wheels, but cutting them was not an option to me. I didn't put the bus on jack stands to support it during this operation, because I wanted to use the friction between tyre and floor. This way I removed, greased and put back one bolt at a time. (All at once would cause serious problems ...). Now I can put the bus on the trolley, allthough it will have to wait until after the vacation in August ...
Nieuwe voorkant ...
Eveneens deze week geregeld: een nieuwe neus voor de bus. Ik had al eerder wat plaatmateriaal gekocht om de neus (voornamelijk de onderkant ervan) te herstellen, maar na wat twijfels over de roestplekken rondom te koplampen en de onderkant van de voorruiten heb ik toch maar de knoop doorgehakt en een deel van het materiaal ingeruild tegen een hele voorkant. Bij Classic VW resto was dat gelukkig geen probleem en ze hadden nog een heel frontpaneel liggen. Nu kan de hele voorkant er af, kan ik ook goed bij de onderliggende plaatdelen om ze tegen roest te beschermen en heb ik straks weer een geheel gaaf front. Hij zit er nog niet op, ook dat komt in Augustus wel, maar het begin is er.
New Front ...
Another part I arranged this week: a new nose for the bus. I bought some sheet metal earlier to repair the front (mainly the lower nose parts) but after some doubts regarding the rust around the headlights and below the front windows I decided to exchange some of the new sheet metal against a completely new nose part. Fortunately, at "Classic VW Resto" they had this part on stock and it was no point trading it against the other parts. Now I can remove the old nose, protect what's under it against rust and fit a whole new nose section. I didn't do the job yet; it has to wait until August as well as the rest.
(Even losjes er overheen geplaatst) (Hung loosely over old nose...)
donderdag 10 juli 2008
21. Karretje is klaar!! (Trolley is ready!!)
En ... dinsdag 8 juli was het karretje klaar!! (Foto onder). Met een aanhangwagentje hebben we het ding bij Martin in Beekbergen opgehaald en meteen naar de loods gebracht. Martin levert vakwerk; het zit oerdegelijk in elkaar. (zie ook de eerder door hem gemaakte pulley-trekker voor het stuurwiel). Er zaten vier -ongeremde- zwenkwielen bij, maar die heb ik vandaag vervangen door twee zwenkwielen met rem en twee starre wielen. Zo gaat ie tenminste niet ongewenst alle kanten op. Vandaag de wielen gemonteerd en het hele ding in de ijzermenie gezet, daarna nog even bij de plaatselijke Hubo langsgeweest om houten balkjes op maat te laten zagen. Die balkjes komen in de U-vormige goten te liggen (boven op het karretje). De bus komt er straks op z'n buik op te liggen en door die houten balkjes beschadigen dan tenminste de chassisbalken niet onder het eigen gewicht van de bus. Het karretje is een ontwerp van Quentin (http://www.hazelarmstrong.com/) en ik moet zeggen dat het er allemaal prima uitziet!!
(zie http://www.hazelarmstrong.com/restauratie-artikels/karretje_nl.html)
Komend weekend gaat ie onder de bus, nadat de wielbouten eerst -met een anderhalve meter lange hefboom- uit de fixatiestand zijn gehaald.
Have been busy last week so ... did nothing, apart from buying some sheet metal to fix the rusty parts on the front of the bus, behind the bumper. Made the trip to Arkel (NL, some 80 km) on Monday to have a first glance at the shop. They sell on-line, but I like to visit shops like this when it comes to a first buy. I didn't weld the parts in place yet, but probably that is going to happen next week. I bought three parts of metal; the inner front valance, behind the bumper, (it comes with two replacement parts for the A-style lower part, the outer front valance and the first 10 cm of the lower part of the nose (which contains a part of the drop-shaped ridge). I am not quite sure of the latter part, perhaps I will replace the whole nose section, up until the front windows. (It was possible to exchange parts if necessary ...)And ... Tuesday july 8th the trolley was ready!! (See photo). We picked it up at Martin's place and brought it to the garage the same evening. It came with four swivel-wheels but I changed them for two braked-swivel wheels and two straight wheels, so that the trolley isn't going anywhere we don't want it to go. Mounted the wheels today and primed the whole thing. Bought some wooden bars later today, these will fit into the U-shaped gutters on top of the trolley and they are there to prevent damage to the chassis beams due to the bus its own weight, when laying on its belly on the trolly. The trolley is Quentin's design (from www.hazelarmstrong.com)
and I have to say it looks great!! (see picture above). Next weekend the bus will be lifted onto te trolley, after the wheelnuts have been loosened with a 1,5 m beam (because they are stuck terribly).
Vandaag (Vrijdag 11-8) nog even de houten balkjes in het karretje geplaatst. Had nog uitsparingen willen zagen in het hout, maar had de zaag natuurlijk thuis gelaten. Dan maar wat oud metaal verwijderd; deze keer het onderste deel van het neusje weggeslepen, niet teveel, maar veiligheidshalve een paar centimeter onder de pasrand voor het nog in te lassen deel. (Waarschijnlijk gaat toch het hele neusdeel eraf ... er zitten mij teveel zwakke plekken in). Op onderstaande foto zie je het roestige restant achter de voorplaat en het vervangingsdeel op de vloer.
Today, Fri 8/11, I put the wooden supports in the trolley. I wanted to saw slots in them -where the chassis beams would fit in- but I forgot to bring the saw of course. Luckily there was enough to do, so I took the mini-grinder and cut away the bottom section of the nose panel, just an inch below the definite cutting line where the new part will fit in later. Probably the whole nose section will be replaced anyway, it's just too damaged and rusted. The photo shows the remaining rusty parts of the inner front valance and the replacement part on the floor.
zondag 22 juni 2008
20. De Compressor ...
Eindelijk een compressor gevonden die aan onze wensen voldoet. Met dit apparaat kunnen we weer verder; luchtgereedschap was al aangeschaft, maar zonder perslucht begin je niet veel. Op marktplaats een aantal aangeboden compressoren vergeleken, maar slechts een paar kwamen door de selectie heen. De eisen waren als volgt:
- Oliegesmeerd
- Tweecylinder
- 230 V
- Tankcapaciteit > 50l.
- Effectieve opbrengst > 150l/min.
- ... en ehhh, betaalbaar ...
Hier is ie dan:
En tegen de achtergrond van de bus waar het allemaal om te doen is ...
Natuurlijk konden we niet wachten en gingen meteen aan de slag, reduceerventiel aangesloten op de tank, conversiekoppeling gemaakt voor het luchtgereedschap (je zult altijd zien dat er sprake is van meerdere standaards voor de aansluitingen), compressor aan de 230V en starten maar. De zekeringen in de loods zijn gelukkig zwaar genoeg en het appraat sloeg dan ook met een mooi regelmatig lopende motor aan. Na zo'n 40 seconden was ie op druk. Luchthamer erop en nu zouden de wielbouten wel loskomen. Helaas ... ze waren zo vast gedraaid dat ook na minuten proberen en een paar luchtladingen later er nog steeds geen beweging in kwam. Het leek wel of ze met loctite waren vergrendeld. Dit vraagt om grof geweld. De volgende keer eerst maar een hefboom aan een dop- of kruissleutel fabrieken en dan nog maar eens proberen. Voor vandaag was het alweer veel te warm in de loods om nog zinvol werk te verzetten zonder liters water te verliezen ... Boeltje opgeruimd, compressor aan de ketting en -licht teleurgesteld- naar huis.